Membuat Hasil ScreenShot pada GNU/Linux seperti Milik macOS
Sekenario Masalah
Seperti apa sih bang, hasil screenshot seperti yang ada pada macOS itu?
Kebetulan sejak 2009 sampai 2014 akhir, saya menggunakan macOS (dulu namanya OSX).
Saya juga beberapa menulis konten blog menggunakan macOS dan cukup sering mengambil gambar screenshot. Seperti yang ada di blog post yang ini:
- Aplikasi Download Alternatif untuk OSX dengan JDownloader
- Memperbaiki Trash OSX
- Memory Cleaner untuk OSX
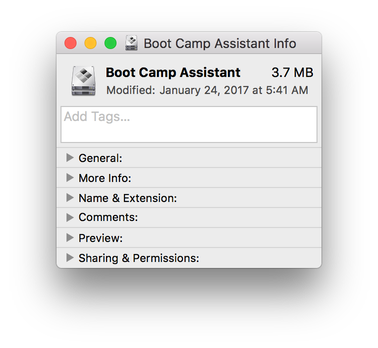
Kira-kira seperti ini hasil screenshot window aplikasi pada macOS.
Pemecahan Masalah
Pastinya tools yang diperlukan adalah ImageMagick.
Kira-kira begini command formula nya.
$ convert gambar.png \( +clone -background black -shadow 50x10+0+10 \) \
+swap -background none -layers merge +repage gambar.png; \
convert gambar.png -bordercolor none -border 30 gambar.png
Misal, saya punya gambar hasil screenshot seperti ini:
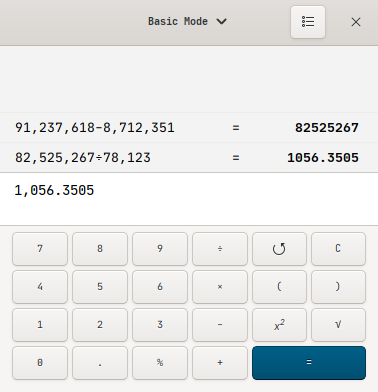
Kemudian, saya jalankan command dari ImageMagick di atas.
Hasilnya akan seperti ini:
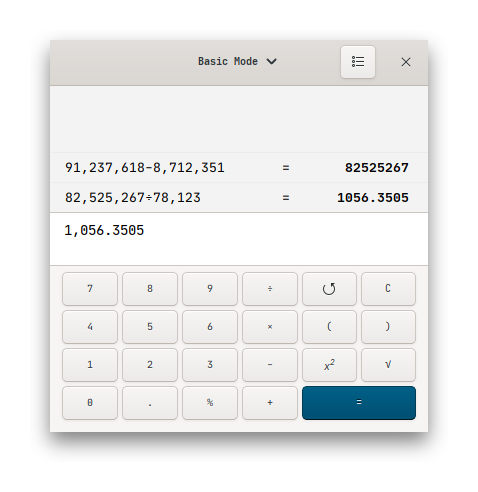
Gambar 3. Menggunakan -shadow 50x10+0+10
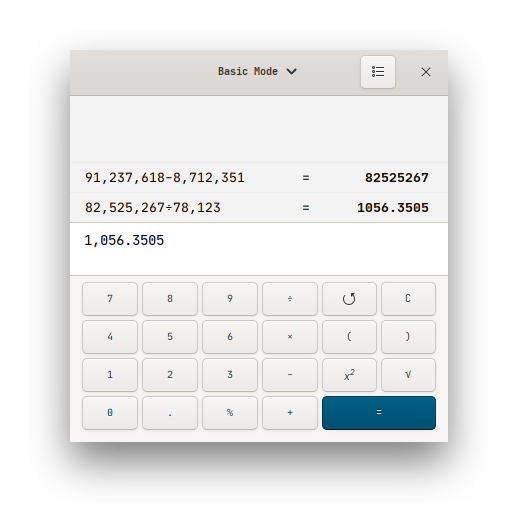
Gambar 4. Menggunakan -shadow 50x20+0+20
Tinggal teman-teman sesuaikan dengan preferensi untuk attribute -shadow nya.
Kalau saya lebih suka yang 50x10+0+10, karena shadownya tidak terlalu beleber keluar.
Tambahan
Saya malas menuliskan command ImageMagick tersebut berulang-ulang.
Jadi, saya putuskan untuk membuat Ruby script dimana targetnya adalah file terakhir yang ada pada direktori screenshot saya.
Karena setiap sehabis membuat screenshot, gambar akan berada pada paling akhir dari direktori screenshot.
File inilah yang akan ditangkap oleh Ruby script dan dipermak.
!filename: $HOME/.local/bin/scrot-imgck
#!/usr/bin/env ruby

# Please wite your dir with ~/ first
screenshot_dir = '~/pic/ScreenShots'
Dir.chdir(File.expand_path(screenshot_dir))
ss_dir = Dir.pwd
list_file = %x(ls -p | grep -v /)
files = list_file.split(" ")
target_file = files.last
target_file_mod = files.last.split("").insert(-5, 'X').join

%x(convert #{target_file} \\( +clone -background black -shadow 50x10+0+10 \\) \
+swap -background none -layers merge +repage #{target_file_mod}; \
convert #{target_file_mod} -bordercolor none -border 30 -set gamma 2.2 \
#{target_file_mod})

puts "SS_DIR: #{ss_dir}"
puts "SOURCE: #{target_file}
TARGET: #{target_file_mod}
FRAMING SUCCESS!"
Perhatikan pada baris ke 13, attribute -shadow inilah yang teman-teman perlu ubah, apabila ingin menyesuaikan bentuk dari shadow.
Kalau berhasil dijalankan, outputnya akan seperti ini:
SS_DIR: /home/bandithijo/pic/ScreenShots
SOURCE: Screenshot_2020-07-28_19-3-51.png
TARGET: Screenshot_2020-07-28_19-3-51X.png
FRAMING SUCCESS!
Ruby script tersebut akan membuat file baru dengan akhiran X yang ada dibelakang nama dari file screenshot target.
Mantap!!!
Saya rasa hanya ini yang dapat saya tuliskan saat ini.
Mudah-mudahan dapat bermanfaat untuk teman-teman.
Terima kasih.
(^_^)
Bonus
Biasanya untuk modifikasi yang dapat kita lakukan, kita akan menambahkan ciri khas kita sendiri.
Maka dari itu, pada modifikasi ini, saya menambahkan ciri khas untuk memberikan author.
Versi Ruby
!filename: $HOME/.local/bin/scrot-imgck
#!/usr/bin/env ruby

# How this script work?
# By put the last file on directory screenshot, and process it with imagemagick

# Please wite your dir with ~/ first
screenshot_dir    = '~/pic/ScreenShots'
Dir.chdir(File.expand_path(screenshot_dir))
ss_dir            = Dir.pwd
list_file         = %x(ls -p | grep -v /)
files             = list_file.split(" ")
original_file     = files.last
target_file       = files.last.split("").insert(-5, 'X').join
color_profile     = "/usr/share/color/icc/colord/sRGB.icc"
color_fg          = "#ffffff"
color_bg          = "#666666"
border_size       = "0"
background_color  = "white"
background_size   = "10"
shadow_size       = "50x10+0+10"

%x(
convert #{original_file} -bordercolor '#{color_bg}' -border #{border_size} \
#{target_file}

convert #{target_file} \\( +clone -background black \
-shadow #{shadow_size} \\) +swap -background none \
-layers merge +repage #{target_file}; \

convert #{target_file} -bordercolor #{background_color} \
-border #{background_size} #{target_file}

convert #{target_file} -gravity South -chop 0x#{background_size.to_i/2} \
#{target_file}

convert #{target_file} -gravity North -background #{background_color} \
-splice 0x#{background_size.to_i/2} #{target_file}

convert #{target_file} -profile #{color_profile} #{target_file}
)

if %x(which optipng > /dev/null 2>&1)
  %x(optipng #{target_file})
  puts "OPTIPNG DONE!"
end

puts "SS_DIR: #{ss_dir}
SOURCE: #{original_file}
TARGET: #{target_file}
FRAMING SUCCESS!"
Versi Python
!filename: $HOME/.local/bin/scrot-imgck-python
#!/usr/bin/env python

import os

# Please write your screenshot dir with full path. Later, I'll improve this.
screenshot_dir   = "/home/bandithijo/pic/ScreenShots"
os.chdir(screenshot_dir)
ss_dir           = os.getcwd()
list_file        = os.popen("ls -p | grep -v /").read().split("\n")[:-1]
original_file    = list_file[-1]
target           = list(original_file)
target.insert(-4, 'X')
target_file      = ''.join(target)
color_profile    = "/usr/share/color/icc/colord/sRGB.icc"
color_fg         = "#ffffff"
color_bg         = "#666666"
border_size      = "0"
background_color = "white"
background_size  = "20"
shadow_size      = "50x10+0+10"
font             = "JetBrains-Mono-Regular-Nerd-Font-Complete"
font_size        = "11"
color_fg         = "#ffffff"
color_bg         = "#666666"
author_position  = ["NorthEast", "+60+16"]
author           = "ScreenShoter: @" + \
                   os.popen("echo $USER").read().rstrip("\n")

os.system(f"""
convert {original_file} -bordercolor '{color_bg}' -border {border_size} \
{target_file}

convert {target_file} \\( +clone -background black \
-shadow {shadow_size} \\) +swap -background none \
-layers merge +repage {target_file}; \

convert {target_file} -bordercolor {background_color} \
-border {background_size} {target_file}

echo -n " {author} " | convert {target_file} \
-gravity {author_position[0]} -pointsize {font_size} -fill '{color_fg}' \
-undercolor '{color_bg}' -font {font} \
-annotate {author_position[1]} @- {target_file}

convert {target_file} -gravity South -chop 0x{int(background_size)/2} \
{target_file}

convert {target_file} -gravity North -background {background_color} \
-splice 0x{int(background_size)/2} {target_file}

convert {target_file} -profile {color_profile} {target_file}
""")

if os.system("which optipng > /dev/null 2>&1"):
    os.system(f"optipng {target_file}")
    print("OPTIPNG DONE!")

print(f"""SS_DIR: {ss_dir}
SOURCE: {original_file}
TARGET: {target_file}
FRAMING SUCCESS!""")
Referensi
-
Create MacOS style screenshots with drop shadow using Imagemagick
Diakses tanggal: 2020-07-28 -
imagemagick.org/script/command-line-options.php#shadow
Diakses tanggal: 2020-07-28 -
PNG image becomes too bright
Diakses tanggal: 2020-08-03